
If you’ve always wanted to photograph live music but have never been sure where to start, this guide is for you. Thanks to our team of expert music photographers, we’ve put together a comprehensive guide to photographing concerts. From navigating your way into the gig in the first place, to figuring out what equipment to bring, this is your one stop for preparing for a live music shoot.
Live music is a unique genre of photography, with its own unique requirements. As you’ll be dealing with unrepeatable moments, it pays to be prepared. The last thing you want is to miss a crucial moment because you didn’t have the right kit, or because you had your head buried in menus trying to find the right settings. Also, concerts are a challenging thing to photograph. Available light can be scarce, you’re often surrounded by other people (not to mention other photographers), and the musicians on stage will be strutting their stuff without giving a thought to your compositions
Read on for our comprehensive explainer on how you can get started photographing live music, and how you can make sure you bag the best shot of the night, every night.
Cracking your way in and etiquette
With live music, most people begin by taking photos of a friend’s band, although in many smaller venues (such as pubs) you can generally get away with taking photos of bands with which you have no connection, providing you remain discreet. If in any doubt, try speaking to the band beforehand to see if they would be happy with you doing so. Establishing this initial connection is useful as the band will often take an interest in your images and may be willing to use them on their socials (and thus, promote you and your work).
Sharing your images with the band — perhaps via their Instagram or on another social network — is a great way to get your photography seen by a wider audience, but remember the issues surrounding sharing your images online, both in terms of what rights the social network may claim over your images and what people may end up doing with your work.
Always credit yourself where possible and insist that people do the same if they are to use your images elsewhere (if you are happy for them to do so). You may choose to use a watermark to further protect your work, although bear in mind what kind of effect this may have on its artistic merits. Keep your work protected but do it tastefully.
Best camera equipment for live music
Although many photographic genres don’t strictly require enthusiast- or pro-level equipment, the often-unforgiving conditions under which live music images are taken change the game somewhat. This is especially true given that you likely won’t have access to many photographers’ best friend — a flashgun. Using one is a no-no in most music performance situations.
Here are some tips for choosing your live music equipment:
Camera: You’ll often be working in low light, so ideally you need a camera characterised by two things: low noise at higher sensitivities and an autofocus system that will continue to function in low light. If, however, you know you’ll be shooting at a festival outside, or perhaps indoors in a well-lit environment, you can still get great results with even a basic camera at moderate ISO settings.
Ideally, you’ll want a decent-sized sensor — APS-C is a good standard to shoot for, though there are some Micro Four Thirds cameras that do quite well in low light. We’d strongly recommend a mirrorless camera or DSLR rather than a compact, so that you can take advantage of different lenses for different situations.
See our guide to the best cameras for low light photography where we have plenty of suggestions to suit live music.
Lens: A lens that offers a wide aperture is key, as you’ll want fast shutter speeds to be able to freeze movement from performers. Fortunately, this doesn’t always mean you have to spend a lot. After all, one of the cheapest lenses you can buy new for most systems is a humble 50mm f/1.8, whose focal length and aperture are both conducive to low-light performance photography. This is a decent option to get started and have in your kit bag, although if you’re using an older model you may find the focusing motor a little tardy.
Naturally, some more expensive lenses are ideal for this kind of photography, such as a professional 24-70mm f/2.8if you’re after a mixture of wide and closer portrait shots. While these tend to be expensive, they aren’t completely inaccessible, particularly if you’re willing to shop second-hand, or look at a third-party lens manufacturer.
See our guide to the best lenses for event photography where we have options to capture professional, high-quality images of gigs, concerts and all kinds of occasions.
Photography technique for live music
In music photography, it pays to be able to react quickly to ensure you don’t miss the key moments, and that means having solid technique. Here are our top tips for technique and settings for live music photography…
Metering
The metering mode you should use will depend on the scene you’re shooting. The kinds of conditions in which only one performer is lit well would suit a spot or centre-weighted metering mode. If you’re lucky enough to be in a situation with decent light, such as an outdoor festival, then it will suit your camera’s default multi-segment/evaluative option.
If you’re shooting under conditions that are constantly changing, or you’re frequently moving around with the intention of capturing a range of different images, you may find it easier to simply stick to the evaluative mode and use exposure compensation as you shoot rather than constantly changing between different metering patterns.

The evaluative/matrix metering option is useful when you want to expose for both the main subject and surrounding areas….
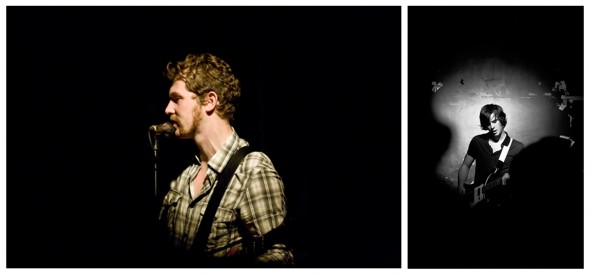
…whereas the partial and spot metering options can be used to pick out and expose correctly for a single subject, perhaps with the intention of framing them with a darker surround.
Aperture and shutter speed
As you’ll be dealing with moving subjects, you’ll generally require a fast shutter speed (and thus a wide aperture) in order to capture subjects sharply. Shooting in the shutter-priority mode and setting a fast shutter speed is one idea, as this will ensure you don’t drop below a certain shutter speed.
However, given that most venues will have constantly varying conditions, it can be more practical to stick to the widest aperture you can get, and adjust the sensitivity until you have the shutter speed you need. This way, if the lighting conditions suddenly change, you will be usefully gifted with an even higher shutter speed to freeze the action.

You should aim for as fast a shutter speed as possible when capturing sudden and rapid movements. Here, a shutter speed of 1/800sec was used.
Timing
An appreciation of music can help you here. Shooting towards the start of the end of a song can often have the performer in a more stable position than, for example in a chorus towards the middle of a song, which places less pressure on you to maintain a fast shutter speed.
If you are familiar with a band’s songs, you may be able to anticipate the likelihood of getting certain images; you may, for example, choose to get a few close-ups when the subject is relatively still and a few more animated ones when they launch into the bridge or chorus of a song. Watch out for harmonies from other members of the band, too; if you miss a good shot of them in the first verse, bridge or chorus, you may be able to get the shot in a subsequent one.
Autofocus
Manual focus can be useful in scenes where the camera simply cannot focus due to poor illumination, although you will probably be relying on your camera’s autofocus system for most subjects. In low light, you will generally want to use the most sensitive central AF point possible, although depending on your camera, those around it may be similarly sensitive.
Check your camera’s manual to see which points are cross-type (i.e sensitive to both horizontal and vertical details) although bear in mind that some cross-type sensors are only effective with lenses of a certain aperture.
If only the central point is sensitive enough to ensure your camera focuses how you need it to, you can focus and use the AF lock setting before recomposing the image, or, alternatively, hold your finger on the shutter-release button after focusing before recomposing the shot. This method isn’t ideal for close-up subjects as it’s easier to end up with slight focusing inaccuracies than with more distant ones, although you’ll generally be able to get away with it if you’re recomposing to a similar distance. If in doubt, take a few shots like this and zoom into the images to see what kind of results you get.

For this image, sensitive peripheral AF point was used to line up against the subject’s eyes. This finds the subject quickly and would allow you to capture the image without recomposing the shot.
One tip is to use one of the peripheral points around a third of the way into the frame, one that you know is sensitive enough to pick out subjects. If you remain in one spot for some time, perhaps to get a decent shot of the main performer, this has the added effect of placing the subject’s face two thirds of the way into the frame, thus helping you to satisfy the rule of thirds and achieve a pleasing composition. Of course, not every image needs to be captured like this, but it’s a technique that’s worth trying nonetheless.
Sensitivity (ISO)
Dark conditions usually mean using high sensitivities — otherwise, it may be difficult to achieve the fast shutter speeds you need to capture subjects sharply. After a few shoots you may find it easier to appreciate the kinds of results you can achieve at different sensitivities, and, although the exact results depend partly on the lighting conditions, you may find a preferred maximum setting. This may be at the end of your standard sensitivity range — such as ISO 6400 or 12,800 — right before you reach any extended settings. Some cameras allow you to set a minimum shutter speed so that you can be sure never to drop past this point — this can be useful.

Pick the sensitivity that will allow you to take acceptably sharp images; image blur is far harder to rectify than noise.
White Balance
Lighting can change dramatically during the shoot, often continuously swooping over performers in different colours. Unless your lighting is constant in colour temperature, shoot Raw images with your white balance in the Auto setting and simply make any adjustments you need to afterwards, either in-camera or later on at your computer. It really isn’t worth trying to remove colour casts by varying the white balance setting as you shoot, as you’ll simply miss too many opportunities.
Top tips for photographing live music
Here are some final tips to keep in mind when you’re photographing a band live on stage.
Watch the eyes
Although you generally want subjects to have their eyes open while you’re taking pictures of them, closed eyes can look great during more emotional moments in a song or performance.
Don’t fret about noise
If you’re forced to use a very high ISO setting and an image you’re otherwise pleased with is full of noise, don’t despair as you can remove the worst of this in post production. Such an image may also suit a black-and-white conversion, with the noise lending it a gritty, film-like quality.
Turn off the stabilisation
Unless you’re panning a subject, or capturing one that’s relatively still, image stabilisation will usually be of little use to you as it is not effective against subject movement, only your own. Image stabilisation allows you to use slower shutter speeds than usual, but with subject movement this will only translate to blurry images.
Keep looking around
Don’t just focus on the performers themselves. Look around for details on instruments, such as strong shapes and distinctive patterns. Consider intentionally blurring the odd image for a more abstract result or panning for blurs of lights and colours.
Check your shots
It may be difficult to appreciate slight blur as you shoot. Take a few initial shots and zoom into your images to check you’re using appropriate settings, although try not to do this during the main shoot (unless the lighting changes significantly) as you risk missing shooting opportunities.

FAQs
What are the best camera settings for gig photography?
Shooting gigs can be tricky with all the movement and low light. A fast shutter speed (around 1/250s or quicker) helps freeze action, while a wide aperture (like f2.8 or lower) lets in more light. You’ll also need a higher ISO (1600–6400) to brighten things up without a flash. It’s all about balancing these settings to get sharp, well-exposed shots.
How do you handle low light when shooting concerts?
Low light is a challenge, but it’s totally doable! A lens with a wide aperture will help, and don’t be afraid to push your ISO higher—modern cameras handle noise well. Shooting in RAW gives you more flexibility when editing, and if the stage lighting is strong, use it to your advantage by timing your shots when the lights hit just right.
What lens should I use for gig photography?
A fast lens with a wide aperture (f2.8 or wider) is your best bet. A zoom lens gives you more flexibility for both wide shots and close-ups, while a prime lens can be sharper and better in low light. If you’re further from the stage, a telephoto lens can help, but it depends on the venue and how close you can get.
How do I get sharp photos at concerts?
Gig photography can be fast-paced, so a quick shutter speed is key to avoiding motion blur. Use continuous autofocus to track performers and burst mode to catch the perfect moment. If the lighting is tricky, try positioning yourself where the stage lights are stronger—it can make a huge difference.
Can I use flash at gigs?
Most of the time, flash isn’t allowed—it’s distracting for performers and kills the atmosphere. Instead, work with the stage lighting, boost your ISO, and use a fast lens to get the best results. If flash is permitted, keep it subtle so you don’t wash out the colours or annoy the audience!
Sign up for our newsletter today!
- Subscribe for exclusive discounts and special offers
- Receive our monthly content roundups
- Get the latest news and know-how from our experts
