Welcome to our complete, comprehensive guide to how to shoot film. Film is such a lovely medium to shoot in — rewarding for those times you take a bit of care, unforgiving when you don’t. When you get it right, you can produce images with a singular, unmistakable vintage look, in a format that is proven to be able to last the test of time.
Shooting film means you’ll be doing without many of the life-savers of modern digital photography: you can forget about shooting at 10fps, you won’t have a swanky AI-powered Subject Recognition doing the hard work of focusing for you, and if your exposure isn’t correct to within a mere stop or so, all the editing software in the world won’t save you. There might be nothing more demoralising than messing up a frame of film — but there’s not much more rewarding than getting it right.
This guide is designed to take you through everything you need to know about film. From which stocks to buy and which cameras to use, to how to get a correct exposure and how to get your film developed, we’re here to answer all your questions. So, let’s waste no more time and learn how to shoot film!
Film photography: Best camera and film
This is going to be the first step you’ll need to take — figuring out which camera and film to buy! The answer to one question begets the other, as certain cameras will only shoot certain types of film. We’ll run through film stocks first, then take a look at camera options.
Which is the best camera film?
Perhaps more now than at almost any point in time — ironically including when film was in its ascendency — film shooters have got it made when it comes to choosing a film. Some of the classics (many of which you can find here at Wex) like Kodak Portra, Kodak Gold, and Ilford’s stellar range of black and white films, have stood the test of time (if not the vagaries of the supply chain) — while a host of upstarts, including the new Harman Phoenix 200, mean you can imbue your film photography with virtually any style or mood you want.
One of the huge appeals of film photography is that colour and tone are “baked in”, much more so than when you shoot a digital image. That means you’ll need to choose your rolls of film based on what you want your images to look like, because while digital photography might allow you to make an image look like almost anything, the images you take from a roll of film are — more or less — in their final form as they leave the lab. Grainy, black and white might suit one occasion, whereas warm and friendly might suit another.
We can offer you two lines of advice here – if you’re feeling flush, don’t mind missing a few shots and prize first-hand knowledge above all else – we’d suggest getting out there and shooting a few different rolls to get a feel for what you love and what you don’t. It was this scientific approach that led me to conclude that Kodak Gold — an admittedly cartoonish, nostalgic, warm film — was my preference over the colder, more detached-feeling Fuji C200.


The second, cheaper, less fun, way of scoping out which films you should be putting through your new pride-and-joy, is to head to a few photo-sharing sites. Instagram is the big one of course — use the tag system to find images labelled with things like #kodakgold200 or #ilfordfp4. You can also head to places like 500px or Flickr — while they’re nowhere near as popular as they were, they still host huge archives of analogue images you can inspect. Just pop the name of the film you’re researching into the box
For absolute beginners, allow us to recommend a few rolls of Kodak Gold 200 and a few rolls of Ilford HP5 400 — both flexible emulsions with a decent amount of exposure latitude which are tolerant to push development (of which more in a bit), and which won’t break the bank like a roll of Portra will. And for many more recommendations, check out our comprehensive guide to the best camera film.


Should I use 35mm film or 120 film?
35mm is far from the only game in town. 120 film is absolutely everywhere – to such an extent, in fact, that 2022 saw Kodak release its popular, bargain-basement Gold series film in 120 format.
The differences? Where 35mm film has a frame width of 35mm, 120 gives you frames in the order of twice as wide, around 56mm. The increase in film surface area gives you similar benefits to shooting a digital camera with a larger sensor — better resolution, finer grain (especially at higher resolutions) and improved image quality at large reproduction sizes.
That whimpering noise in the background? That’s your bank manager curled up in a ball because 120 film isn’t cheap. The cost of an actual roll is pretty reasonable — you’ll pay under a tenner per 120 roll of Ilford HP5 or Kodak Gold 200, though you’ll generally have to get the latter in a five-pack.

The drawback is you get far fewer exposures: exactly how much 120 film is used per exposure depends on your camera. 645 cameras, such as the Fuji GA645i, shoot 120 film in 6x4.5cm slices and will give you around 15 exposures per roll. It’s all downhill from there – a 6x7 body like the Pentax 67 will shoot about 10 exposures, and a panoramic camera such as the Fuji GX617, which shoots 120 film in obscene, 6 x 17cm chunks, will net you just four exposures per roll.
Should I buy expired camera film from eBay?
Yes. Well… maybe.
Camera film deteriorates with age. This is why film canisters have an expiration date stamped on them. Still, that didn’t stop some wizened soul from loading a roll of expired film and loving the random, hue-shifting results they got. And now, shooting expired film is all the rage! So much so that if you go hunting for job-lots of expired film on eBay, you’ll frequently find that they’re selling for the same, or even more, than equivalent rolls of unexpired film.
Fans revel in the glory of the unexpected, once-in-a-lifetime look of (some) expired film. While others blanch at the prospect of shooting 36 whole frames only to find an entire roll of underexposed rubbish at the development stage.
If you’re going to experiment with expired film — and who are we to stop you? — remember you need to overexpose by a stop for every 10 years that’s passed since the film expired. So, if your roll of ISO 800 film expired a decade ago, you’d be setting your camera to ISO 400. Just remember that when you want reliable results, all of our film stock is in-date.
How to choose the best film camera
So, you want a camera. You have some choices to make which will affect your entire journey through shooting film, starting with the format. The most obvious starting point is 35mm. Affordable, simple, and superb value for money. We’ll come onto which specific stocks to choose in a moment, but suffice to say for now, 35mm is definitely the best starting point for beginners.
35mm SLRs
These interchangeable-lens cameras are some of the most popular 35mm film cameras around. They are everywhere and can — if you’re patient — cost virtually nothing. My current go-to film camera is the 1984 Canon T70. It’s not much of a looker but it’ll do everything you could ask of a film camera. It’s relatively sophisticated, with both average and spot metering, a digital exposure counter, shutter priority mode plus full-manual exposure, and a handy-if-deafeningly-loud motorised winder, and it cost me all of £15.
You can spend much more, of course – aesthetes will want something along the lines of the Canon AE-1, a timeless piece of design with a manual winder that currently goes for between £200 and £300 if you want one in working order. The Canon AE-1 is hugely popular because of its classic styling, vast lens selection and incredible reputation for build quality — though that popularity has also worked to inflate its price.
Point-and-shoot film cameras
Point-and-shoot cameras, or compacts, are a simpler option, with no need to factor in the cost of additional lenses. Compact film cameras have many of the advantages of their digital brethren – you don’t need to worry about exposure modes or shutter speeds, focus or any of that malarkey.
While the fashionable Contax T2 has been going for about a grand ever since it was spotted on the arm of Kendall Jenner, you don’t need to fork out that kind of money. If you’re happy with something a little more basic — and conveniently, under £100 — something like the Olympus Mju should do the trick.
120 film cameras
If you do want to shoot larger 120 film (see below for an explanation of the differences) between formats) 120 cameras themselves run the gamut in terms of price. If you’re after something cheap and cheerful, Holga is still making new 120 cameras, and you’ll be able to bag a brand new Holga 120N right now.
If you want something with a bit more personality, 120 cameras come in all shapes and sizes. Feeling flush? How about something like the Hasselblad 500EL, which with a lens will set you back the thick end of a grand. Still less than a full-frame mirrorless camera, though…
What are the best features of film cameras
By the time film was replaced by digital, it was a thoroughly mature technology. So while you’ll never find a film camera with the bells and whistles of a current-gen digital camera, shop wisely and you’ll pick up something with plenty of features.
Consumer 35mm cameras never got much better than the Canon 300X, for instance. Evaluative, partial and centre-weighted metering make getting accurate exposures easy, while the EF-mount means it’s compatible with an absolutely vast range of lenses, from mid-90s classics to L-series lenses that have just rolled off the production line. They lack the cool factor of more classic designs, but that makes them affordable — expect to spend under £50.
Of course, if you can see your prospective camera in person before you buy it, do! You’re dealing with a precision instrument — you need to see, hear and feel that the shutter and winder are crisp, and the exposure indicator — if there is one — dances eagerly around as you point the camera at bright and dark objects.
And apart from that… you’re sort of on your own. If you buy from a shop, you’ll have some protection against your new camera being a dud (unless it’s sold-as-seen). But otherwise, you’ll have to wait until you’ve put a roll of film through it before you can be certain it’s working perfectly. Some cameras have shutters that slowly become inaccurate over time, so a 1/100th of a second might end up looking more like 1/60th.
Once that roll of film is developed you should look out for things like light leaks — where the film isn’t perfectly sealed from light while it’s in the camera, leading to entertaining but annoying splashes of colour and light across your frames. In some cases, light leaks can be repaired at home — depending on your level of mechanical confidence, available tools and willingness to potentially damage your new prize and joy.
Otherwise, with such a glut of film cameras out there, there’s a huge community willing to lend its ideas and expertise if your camera behaves unexpectedly. You’ll also be able to find a decent number of spare parts for the most common brands. If self-repair is important to you, stick to the big names — Canon, Nikon, Pentax and Olympus all have plentiful spare parts and donor bodies available.
What issues can film cameras suffer from?
Film cameras can suffer from almost every mechanical, electrical, biological (seriously) and chemical failure known to humanity. So, if you’re buying vintage camera gear, go in with your eyes open and your watchmakers’ screwdrivers at the ready.
If you’re just starting out — as I was a few years ago — you’ll probably be looking at film cameras not much older than the late 70s. The good news is that this was the era of real technological and mechanical mastery when it came to consumer electronics, and subsequently, there are lots of cameras out there with years of life left.
Of course, if you can see your prospective camera in person before you buy it, do! You’re dealing with a precision instrument — you need to see, hear and feel that the shutter and winder are crisp, and the exposure indicator — if there is one — dances eagerly around as you point the camera at bright and dark objects.
And apart from that… you’re sort of on your own. If you buy from a shop, you’ll have some protection against your new camera being a dud (unless it’s sold-as-seen). But otherwise, you’ll have to wait until you’ve put a roll of film through it before you can be certain it’s working perfectly. Some cameras have shutters that slowly become inaccurate over time, so a 1/100th of a second might end up looking more like 1/60th.
Once that roll of film is developed you should look out for things like light leaks — where the film isn’t perfectly sealed from light while it’s in the camera, leading to entertaining but annoying splashes of colour and light across your frames. In some cases, light leaks can be repaired at home — depending on your level of mechanical confidence, available tools and willingness to potentially damage your new prize and joy.
Otherwise, with such a glut of film cameras out there, there’s a huge community willing to lend its ideas and expertise if your camera behaves unexpectedly. You’ll also be able to find a decent number of spare parts for the most common brands. If self-repair is important to you, stick to the big names — Canon, Nikon, Pentax and Olympus all have plentiful spare parts and donor bodies available.
What issues can film camera lenses suffer from?
Since your old camera will probably mean old lenses — unless you opt for something with a Canon EF-mount, or a Nikon F-mount — you should keep your eyes peeled for problems there, too. Since you’ll be using manual focus a lot more (perhaps exclusively), the focus ring on your camera should turn smoothly and freely — indeed, since it was intended to be used for every shot, you’ll probably find it a more satisfying mechanism than the lens on your DSLR.
Be on the lookout for fungus as well. Fungus is caused by microscopic spores making their way into a lens, then sitting quietly in the dark and damp for years, which allows the fungus to grow on the inside of the glass elements in the lens. Fungus is tricky old stuff — it might not show up super well in online auction pictures, and depending on the lens you have it can be impossible to clean. The good news is — speaking from personal (bitter) experience — lenses can endure a surprising amount of fungus before it starts to obscure or soften an image. So, don’t freak out about it too much. Plus, because lenses with fungus get such a bad rap, you can expect to save some money!


Film photography: How to shoot, develop, scan and edit
So, you’ve got your camera, with a lens or two if necessary, and you’re satisfied that it’s in working order. The next thing to do is start shooting! There are a few concepts worth getting your head around when it comes to shooting film, so here is our complete guide to everything you need to know.
What does ISO mean on camera film?
For photographers who have built up a bit of experience with digital photography, ISO on a roll of film means exactly the same as it does in a digital camera: a low number means the film is less sensitive to light, which in turn means you’ll need either longer exposures or bigger apertures to get a well-exposed result.
So, a roll of 200 ISO film might be a great choice for a holiday in the sun, while a roll of ISO 800 film will be better suited to a late-finishing music festival or covered skatepark. Of course, the drawbacks to high digital ISO are present with film — higher ISOs mean more grain.
It’s worth having a few rolls at different ISOs on hand so you can load your camera differently depending on how much light you’re expecting to work in. Also, don’t forget that we’ve all been spoiled by two decades of high-quality digital photography — changing ISO on a modern mirrorless camera or DSLR is the work of a few button presses. The only way to change ISO on a film camera is to either abandon the roll you’re halfway through, or start developing film yourself.
What is pushing/pulling film?
In development terms, the question of whether camera film can be pushed or pulled gives film photographers something nerdy to talk about on photo walks and/or in the pub. If you’re new to all of this, even if you don’t have a clue what you’re talking about, just say something like, “yeah, you can push it two stops really beautifully” and you’ll still be welcomed into the film community with open arms.
If you’d actually like to know what you’re talking about, you should know that pulling and pushing film means developing it at either a lower or higher ISO than it’s rated for. So, if you’re pushing a roll of ISO 200 film by one stop, you’ll be developing it at ISO 400.
Why? It lets you treat a roll of film as though it’s more sensitive than it actually is. So, if you plan to push a roll of ISO 200 to ISO 400, you’ll be metering a stop faster than you would otherwise — allowing you to shoot, for example, at 1/125th of a second instead of 1/60th — which could make a significant difference when it comes to sharpness.
Pulling, on the other hand, goes the other way. Your film might be rated at ISO 200, but you’ll be shooting as if it was rated at ISO 100. Theoretically, this gives a cleaner image or access to longer shutter speeds, but the image quality gains are generally minimal. Mr advice: don’t bother.
Push or pull development is something you need to think about when you load your film. If you’re getting your film developed at a lab, they’ll be pushing or pulling the whole roll, so you’ll need to decide how you’re going to develop your film when you load it. You can’t change ISO mid-roll. You can normally mark on the canister if a roll has been shot at the “wrong” ISO — do that so you don’t forget to instruct your developing lab accordingly.
What’s the best light meter for film photography?
There are a few useful tools that will ease your transition into film photography. Of these, allow us to mix the modern and the antique by introducing you to the exceedingly useful world of smartphone light meter apps.
There are a bunch about, for various different platforms. Look for one that allows you to choose from either average or spot metering. From there, you input your fixed variables (for film cameras, typically ISO) and then it’ll work out what the other two settings should be for an average exposure.
In many cases you can force the app to over- or underexpose, see a live histogram as well as a few other handy features. In my experience the results on offer from a good light meter app will line up nicely with a known, accurate camera meter.
Anyone experienced with buying used film cameras will tell you that the light meter is usually the first thing to go. However, a camera with a broken light meter can still take a picture, and so a smartphone light meter app is a cost-effective way to keep it useful.
Where should I get my camera film developed?
Home development is a lot of fun, but requires a decent amount of time, patience, knowledge and space. We do sell a full range of darkroom equipment if you want to give developing a crack yourself.
However, realistically most film shooters are going to be sending their film off to developing labs. There are a decent number of labs around the UK that offer convenient, competitively-priced film development. It’s always worth checking out reviews on search engines and social media to help you gauge whether people love the results they’re getting back.
Look for things like decent turnaround times, (of course) the quality of the images photographers are posting, and a bit of enthusiasm on social media — these are all clues that you’re sending your beloved rolls to an outfit that cares as much as you do.
Should I scan my camera film myself?
It may be beyond most of us to develop film ourselves, but that’s not necessarily the case with scanning. Though it should be said that scanning is not as easy as it looks, and getting a good scan from a roll of developed 35mm film requires familiarity with both your scanner and photo editing tools. You may well still prefer to let the lab handle it.
To scan film well, you need confidence in adjusting curves and levels, and to be able to read a histogram, as well as having plenty of hard disk space to store the initial high-res scan before you edit it to (theoretical) perfection. I’m a bit of a digital hoarder, which means scanning a whole roll using my Epson V600 (still a beast, 13 years after its release) costs me about 18GB before exporting my images as final JPEGs.
If you think you’ve got the chops, scanning your own film is deeply satisfying and, in the long term, cheaper than getting a lab to do it for you.
There are a few ways of peeling this particular banana. For photography fans, there’s the option of rigging a camera with a macro lens over a colour-corrected lightbox with a frame of film mounted to it. The process is simple — mount your camera vertically over the lightbox, get your macro lens as near as you can, focus it *perfectly*, and then capture your negative frame for posterity.

It’s a fun solution (if not necessarily a perfect one) – for one thing, if you’ve got 36 frames to digitise, realigning your film and/or camera each time is going to take hours, and you’ll still need to edit your images. Still, if you already own a camera with decent resolution and a macro lens, this could be a low-cost way into digitising your own film.
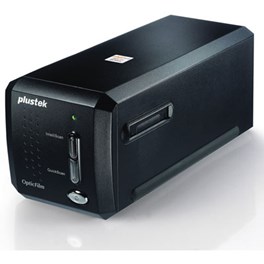
If reliability is what you’re after, you’re probably in the market for a decent film scanner. There are some great options available, from film-only options such as the Plustek 8200i SE OpticFilm Scanner, which is specifically designed for 35mm film. It’s small, it’s convenient, and it even comes with a handy-handy carrying pouch.
Still, it only scans 35mm film – enough for most, but if you end up well and truly bitten by the film photography bug you’ll quickly find yourself eyeing up medium format cameras, for which you’ll be wanting a flatbed scanner. As mentioned, my Epson V600 has pride of place in my photography cave, scanning both strips of 35mm film or 120 format film via its plastic film holder. If you want to go bigger still, Epson also makes the V850, which will scan up to 8x10 film when it’s placed directly on the scanning bed.
How do you edit film photography?
As ever, shooting and editing go hand in hand, and if you’re more of a ballpark photographer when it comes to exposure, as opposed to someone who likes to get things exactly where they want in-camera, you’ll need to make some adjustments.
Film photography has nowhere near the exposure latitude of digital photography, and as someone used to being able to make monumental misjudgements when exposing for digital and still end up with a presentable image, film can come as a rude shock. Consumer film — think Kodak Gold 200 and so on — might offer you about eight stops of dynamic range, often weighted to the highlights, which means it’s better to over- rather than underexpose.
This means you may need to considerably tighten your game when getting your exposures right. Expect light areas to bleach into overexposure faster, and shadows to descend into crushed black much earlier than you might expect from a current-generation, full-frame camera. On the plus side, that reduced editing latitude does mean that you’ll spend less time putting lipstick on pigs: if an image is underexposed as its comes out of the darkroom, it will probably continue to be underexposed no matter how much time you spend on editing it, allowing you to cut your losses and move on to other, more promising images.
Otherwise, it’s best to get used to using levels adjustment layers in Photoshop. You can make use of adjustable opacity and clipping masks, and powerful filters such as the fast pass filter for sharpening. These powerful tools are far more fine-grained and customisable than Adobe Lightroom.
I’d suggest using multiple layers and where possible, work on Smart Object. This gives you the ultimate combination of flexibility and non-destructive editing. One caveat of this editing method is that instead of creating relatively low-res, compressed JPEG scans, the file sizes will be enormous. If you really want to keep every edit you’ve made to a frame of film between the scanner and its final export, expect a single roll to cost tens of gigabytes.


Film photography vs digital photography
Plenty of skills translate directly from shooting film to shooting digital. If you have a grasp of stops, shutter speeds, apertures and ISOs, you’ll find yourself in a good place.
Film vs digital: Care and attention
It’s true, of course, that you need to be more attentive. The result of what you’ve shot isn’t fed back to you immediately, and building up the confidence that you’ve measured your metering correctly can take a little while.
Interestingly, I feel this goes doubly so now we’re in the heady world of being able to see what your exposure will look like before you’ve even pressed the shutter button! But that lesson does double duty — film photography forces you to slow down and think about your exposures. No longer can you just snap away “practice” images and make adjustments based on them; you need to get it right the first time, which requires a level of mindfulness that digital does not.
Film vs digital: Technical considerations
How does shooting film compare technically? It is similar but not the same. A hundredth of a second is still a hundredth of a second, and aperture size is still the square root of focal length. ISO 100 is still pretty dark, and ISO 200 is still twice as sensitive. If you have an exposure of 1/250th, f8 and ISO 200; and you increase the shutter speed to 1/500th, your image will be halved in brightness. It is, in all kinds of gorgeous, filmic ways, business as usual.
Film vs digital: Timing
How’s your trigger discipline? If you’re the type to fire off two thousand frames on a week’s holiday, film will be a rude — and expensive — shock. Depending on the film you shoot, a single frame might cost you around a pound from buying the film to getting it digitised, and that’s generously ignoring the fact that you just bought that scanner, isn’t it?
Not only is blasting through a roll of film expensive, it’s also impossible to get through a roll of film at the same rate you do digital images. Even moderately-priced digital cameras can shoot upwards of 8 frames per second, which is a rate that only the most expensive, sports-specialist film cameras ever managed.
That’s obviously very restrictive, and means that film photography and, say, sports, will rarely mix satisfyingly. But it also means that you need to be precise when it comes to e.g. portrait photography, as your chances of accidentally catching the perfect facial expression are that much lower. If you’ve ever wanted to improve your timing and directing skills, film is the way to do it.


FAQs
What is the best film for beginners?
The best film for beginners is one that offers a balance of exposure latitude and affordability. Colour negative film is a great starting point as it’s more forgiving with exposure mistakes. Black and white film is also popular for learning, as it helps understand contrast and lighting without distractions.
How do I store camera film properly?
To keep film in top condition, store it in a cool, dry place away from direct sunlight. Refrigeration helps extend its shelf life, especially for colour film, but let it reach room temperature before use to avoid condensation. Expired film can still be used but may produce unpredictable colours or contrast.
Why do my film photos look grainy?
Grain in film photography is mainly influenced by the ISO rating of the film. Higher ISO films (e.g. ISO 800 or above) have more noticeable grain, especially in low light. Underexposure can also increase grain, so ensuring correct exposure when shooting and scanning will help maintain image quality.
How do I develop film at home?
Developing film at home requires a few key supplies including a developing tank, chemicals, and a dark space or changing bag. Black and white film is the easiest to develop yourself, following a process of developing, stopping, and fixing. Colour film is more temperature-sensitive but can be done with the right chemicals and patience. It's safe to say that developing film at home isn't the easiest task.
How long does film last before it expires?
Most film has an expiration date printed on the box, typically a few years from purchase. Colour film tends to degrade faster than black and white, leading to colour shifts or reduced contrast over time. Stored properly in a fridge or freezer, film can last well beyond its expiry date with minimal quality loss.


Sign up for our newsletter today!
- Subscribe for exclusive discounts and special offers
- Receive our monthly content roundups
- Get the latest news and know-how from our experts